|
|
|
|
|
|
|
|
|
|
Android configuration for push notifications (Firebase)
From WINDEV Mobile 22 Update 1 (version 220052), the Push notifications in Android are using the Firebase platform (instead of Google Cloud Messaging). To use the Firebase platform, you must have a Google account and you must perform a specific configuration. This help page presents the different operations to perform. Follow these steps: 1. Creating a Firebase project Note: It is also possible to import a Google API Project (used by GCM to send push notifications) from this console. 2. Adding Firebase to the Android application - Click the "Add Firebase to your Android application" button.
- Fill the package name of the application with the one defined in the Android generation wizard.
- Click "Register app".
- The next step is to download the "google-services.json" file..
- Click "Next" and then "Go to console".
3. Download the "google-services.json" file.
If you haven't downloaded the "google-services.json" file previously: - Display your application settings:
- In the Android application section, download the "google-services.json" file.
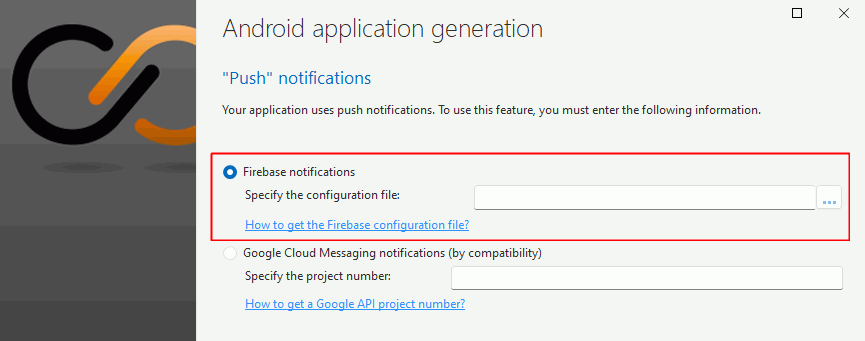
This file must be provided in the application generation wizard:  4. Retrieve the data required by NotifPushSend.
There are two types of Cloud Messaging APIs: - Firebase Cloud Messaging API (V1): By default, this API is enabled on new projects.
- Cloud Messaging API (old version): This API is disabled by default on new projects.
Until version 28, only Cloud Messaging API (Legacy) was supported. To use the legacy Cloud Messaging API: - Click the "Cloud Messaging" tab.
- If necessary, enable Cloud Messaging API (Legacy) in the Firebase project settings.
- Copy the identifier of server key.
This key number must be passed as parameter to NotifPushSend.
To use Firebase Cloud Messaging API (V1): - Click the "Cloud Messaging" tab.
- If necessary, enable Firebase Cloud Messaging API (V1) in the Firebase project settings.
- Go to the "Service accounts" tab and then click "Generate new private key".
- Confirm the warning message and click "Generate key".
- A JSON file is downloaded to the current computer. Pass the content of this JSON file to NotifPushSend. You can use fLoadText to get the content of the JSON file, for example.
|
|
|
|
|
|
|
|
|
|
|
|
|
|
|
|
|
|
|
|