- Overview
- How to?
- Creating a configuration
- Working on a project configuration
- Generate a project configuration
- Add an element into a project configuration
- Exclude an element from a project configuration
- Duplicate a project configuration
- Delete a project configuration
- Characteristics of a project configuration
- Options in the "General" tab
- Tips
Project configurations are used to define the different types of generation supported by the project: 32-bit executable, 64-bit executable, Webservice, component, etc. The project elements can be: - common to several configurations (a window used in a 32-bit executable and in a 64-bit executable for example).
- specific to a configuration (a class used by a component for example).
You can work on a specific configuration at any time. Elements that do not belong to this configuration appear grayed out in the "Project explorer" pane. This help page presents the following topics:
 Warning Warning
From version 2025 onwards, project configurations can only be manipulated via the "Project Explorer" pane.
Creating a configuration By default, a single configuration is created in the project. This configuration is named like the project and it contains all project elements. To create a new configuration: - In the "Project explorer" pane, right-click "Configurations" and select "New configuration".
- The project configuration creation wizard opens. Specify:
- the configuration name.
Please note: If the project contains several project configurations, this name will also correspond to the name of the directory in which the project configuration files will be generated. - its description.
- generation type: executable, Java, library, component, web service, DotNet assembly, DotNet executable, etc.
Note: This feature is not required if the platform has been selected at creation.
- According to the type of generation chosen for the project configuration, it is possible to specify additional options:
- Multi-product compatibility options: The element will be generated only for a specific project type or for use in all products (WINDEV, WEBDEV and WINDEV Mobile). The compilation errors can be enabled (or not) for the 64-bit or Linux compatibility.
- Operating system and platform.
- If necessary, specify the project elements to be integrated into the project configuration being created (windows, reports, queries, etc.). If your project uses components, you can also select the components included in the configuration.
- Validate the configuration creation. This project configuration is automatically selected.
This configuration can be modified via the "Description" option of the project configuration context menu in the "Project Explorer" pane. Directory of project configurations:
By default, when a project configuration is created, the files of this configuration are generated in a subdirectory of the project's EXE directory. This allows you to easily find the files generated by a configuration. If the project already was a multi-configuration project, when creating a project configuration, a wizard plane proposes to generate the configuration files: - in the EXE directory of the project (option kept for backward compatibility).
- in a subdirectory by configuration (created in the project's EXE directory). In this case, a directory is created for each one of the configurations that exists in the project. The name of this directory corresponds to the name of the project configuration.
Remarks: - In the "Options" tab of the project description window, "Generate all the configurations in the "Exe" directory (not recommended if several configurations)" is used to restore the operating mode of earlier versions.
- In GO mode, the files used are those present in the configuration directory (INI files, data files, etc.).
- When a project configuration is first created, the entire contents of the EXE directory are copied to the subdirectories of the project configuration. You may have to delete the files not affected by the current configuration (for example, EXE file not required in the directory of a component configuration).
- You also have the ability to create a project configuration from an existing configuration. To do so, perform a duplication of configuration.
Working on a project configuration To select a working configuration, simply double-click on the desired configuration in the "Project Explorer" pane, or select "Activate this configuration" from the context menu. The entire project corresponds to the configuration named like the project. When working on a specific configuration: - In the "Project explorer" pane, the icon next to the name of an unused element in the current configuration is grayed out.
- A first window or a first page can be defined for each project configuration.
- You can set the user groupware options for each project configuration.
- When generating the elements of a configuration, only the elements defined in the configuration are taken into account.
- In the quick access buttons, the generation icon automatically adapts to the type of configuration handled (creation of an executable, creation of a JAVA archive, etc.).
Generate a project configuration To generate the result of a project configuration: - Display the project configuration management window: in the "Project Explorer" pane, open the context menu for the "Configurations" option and select "Manage configurations".
- Select the project configuration to generate.
- Click the "Generate" button.
Add an element into a project configuration To add an element into a configuration: - In the "Project Explorer" pane, select the element to be added (window, state, etc.).
- Right-click to open the context menu and select "Configurations".
In the menu that is displayed:
- the checked configurations are those that are associated with the element.
- the unchecked configurations are those that are not associated with the element.
- "All" associates the element with all the configurations.
- "None" dissociates the element from a configuration.
- "Multiple" allows you to choose the configurations you want to associate the element with.
- Select the unchecked configuration into which the element will be added.
Note: When saving a new element, the following window appears: This window lets you specify the configuration in which the current element is to be added. To make this window appear automatically each time a new item is saved, check "Ask for the location of the new elements in the project" in the "Options" tab of the project description. Exclude an element from a project configuration To exclude an element from a configuration: - In the "Project Explorer" pane, select the element to be excluded (window, state, etc.).
- Right-click to open the context menu and select "Configurations". In the menu that is displayed:
- the checked configurations are those that are associated with the element.
- the unchecked configurations are those that are not associated with the element.
- Select the checked configuration for which the element will be excluded.
Note: Items excluded from a project configuration are not compiled for that project configuration. The element code is grayed.
In the non-compiled code: - no assisted code input is available.
- there are no cross -references: no Shift+F2, element uses are not seen, elements may appear in the lists of orphan elements and dead code.
- no code analysis: no intelligent renaming.
- there are no compilation errors: if you modify the prototype of a procedure, the error will only be displayed when you switch to a configuration that allows the code to be compiled.
Duplicate a project configuration Project configurations can be duplicated: - from the "Project explorer" pane.
- from the configuration management window.
To duplicate a project configuration from the "Project explorer" pane: - Select the project configuration to duplicate.
- Open the context menu of the description and select "Duplicate".
- The new project configuration appears in the "Project explorer" pane.
- Modify (if necessary) the new project configuration:
- In the "Project explorer" pane, open the context menu and select "Description".
- In the "General" tab, modify the name, generation type and generation directory of the duplicated configuration.
To duplicate a configuration from the project configuration management window: - Display the project configuration management window: in the "Project Explorer" pane, open the context menu for the "Configurations" option and select "Manage configurations".
- Select the project configuration to duplicate.
- Click "Duplicate".
- Modify (if necessary) the new project configuration:
- Click the "Description" button.
- In the "General" tab, modify the name, generation type and generation directory of the duplicated configuration.
Remarks: - The duplicated configuration and the source configuration contain the same elements. This allows you to easily create an iOS configuration in an Android project.
- The name of generated element must be modified if necessary in the corresponding generation wizard.
Delete a project configuration To delete a configuration: - Select the desired configuration in the "Project explorer" pane.
- Select "Delete" from the menu of the "Project explorer" pane.
Remarks: - Configuration elements (windows, states, etc.) are retained in the project.
- Generated elements (executable, service, component, etc.) will not be deleted from disk.
Characteristics of a project configuration To modify a project configurationIn the "Project Explorer" pane, display the "Configurations" context menu and select "Manage configurations". The window for managing the configurations allows you to describe: - a command line for testing project configuration: "Test mode" button.
- action to be taken before generating the project configuration: "Action before generation" button. Simply specify the action to perform at the time of generation.
- action to be taken after project configuration generation: "Action after generation" button. Simply specify the action to perform after the generation.
The "Description" button opens the configuration description window. This window includes several tabs: - "General" tab, which contains general information of the configuration. For more details, see Options in the "General" tab.
- "Elements" tab, which contains the list of elements in the configuration.
   This tab also allows you to identify and configure the opening and/or closing animations of windows in the configuration via "Animations of windows". For more details, see Window animation. This tab also allows you to identify and configure the opening and/or closing animations of windows in the configuration via "Animations of windows". For more details, see Window animation. - "Components" tab, which displays all the external components used by the project configuration.
- "Compatibility" tab, which lists the compatibility options of the project configuration. These options concern: ** multiplatform options: It is possible to:
- Enable or disable compilation errors for 64-bit or Linux compatibility.
 Display errors related to pre-launched sessions. Display errors related to pre-launched sessions.
- the cross-platform options of a "Component" configuration.
- "Unicode" tab, which allows you to define whether UNICODE or ANSI strings are used at runtime.
- "Telemetry" tab, which is used to enable the telemetry for the current configuration and specify the necessary parameters. For more details, see Enabling the telemetry.
- "GPU " tab, to enable or disable the User Groupware for the current configuration.
- "GPU / Private Store" tab, which allows you to enable or disable the User Groupware and/or the deployment to the Private Store for the current configuration.
Options in the "General" tab The "General" tab includes the following options: - general information General information: configuration name and description.
- the generation information:
- the type of generation.
- the project configuration generation directory if the project contains several configurations.
- the actions to be performed before and after generating the project configuration.
- the actions to be performed before generating the application via Gradle.
- the first windows or first pages.
 - first project window Selects the first window to be displayed when the project (or associated executable) is launched.
The [...] button is used to preview all project windows for fast selection.
For more details, see First project window.  first window for phones Select the first window to be displayed when the application is launched on a phone. first window for phones Select the first window to be displayed when the application is launched on a phone.
The [...] button is used to preview all project windows for fast selection.
For more details, see First project window. - first window for tablets Selects the first window to be displayed when the application is launched on a tablet.
The [...] button is used to preview all project windows for fast selection.
For more details, see First project window. - home page Selects the site's home page.
The [...] button is used to preview all project pages for fast selection.
For more details, see The home page. - the first dynamic page Selects the first dynamic page of the project.
The [...] button is used to preview all dynamic project pages for fast selection.
For more details, see First dynamic project page. - error page Select the page used to display site errors.
The [...] button is used to preview all static project pages for fast selection.
For more details, see A specific page to display the errors.
- the executable characteristics.
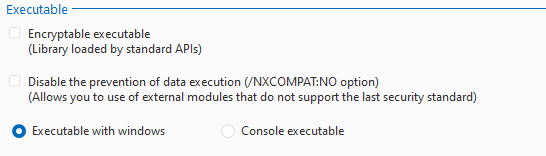 - The "Encryptable executable
(Library loaded by standard APIs)" option makes generated executables compatible with executable encryption and compression tools (UPX, Envelope HASP, etc.).
- "Disable the prevention of data execution (/NXCOMPAT:NO option)
(Allows you to use of external modules that do not support the last security standard)" is used to manage the "NX" compilation option (No eXecute).
- The 32-bit executables and DLLs for Windows are now compiled with the "NX" option (No eXecute). This option is commended to improve security. It must necessarily be used in order for an application to be certified by Microsoft for example. An application compiled without this option can allow its author to execute a code placed at a specific location in memory. This technique, already used by malevolent applications, is not allowed anymore.
- The option "Disable the prevention from running data (/NXCOMPAT:NO option)" is used to compile without the "NX" option. This may be necessary if the executable uses a third-party DLL (ActiveX, ODBC database access driver, etc.), which does not have the NX flag and executes code in memory via what may be a security hole. If the main application is compiled with the NX option, it will be stopped by Windows in general protection fault (GPF).
- Remarks:
- We advise you to solicit the DLL publisher in order to get a refreshed version of DLL with the NX flag.
- We advise you to foresee in the medium term an alternative to the use of DLL. With the ever-increasing security of systems, it is quite likely that executables without the NX option may no longer be run in the near future.
- "Executable with windows" and "Console executable" are used to specify whether or not the executable corresponding to the current project configuration should display windows. In the latter case, it could be a Batch executable executed in command line mode, for example.
 New in version 2025 SBOM New in version 2025 SBOM
The option "Generate Software Bill of Materials with the executable" allows you to generate a JSON file of type "<Application name>.sbom.json" which exhaustively lists all the software components and their dependencies for the generated application. - Android-specific options:
- Apply Material design theme to native controls and to Info/Error/Dialog windows: If this option is checked, the Material Design theme is applied by default to all native controls. If this option is not checked, the holographic theme is used by default.
- 22-compatible label positioning: from version 23 onwards, the window editor display becomes even more WYSIWYG: the padding indicated in fonts is now taken into account. The option "Positioning of captions compatible with version 22" restores the appearance of version 22 (for projects created in earlier versions, for example).
- Device management application (can become "device owner" for the kiosk mode): This option supports the full kiosk mode. For more details, see Application in kiosk mode.
- Action bar height: This option allows you to set the height of the Action Bar control in the different windows. Until version 25, the height of Action Bar controls is 48 px by default. Starting with new projects in version 26, the height of the Action Bar control is 56 px by default. This option allows you to change the height of the Action Bar control in existing projects.
Note: If you change the height, the new height is applied to all windows in the application.
For the actions before and after generation, the following operations must be performed: - Type the command script to run. You can type:
- the path of an executable: enter the path directly in the field, or use the "Browse..." button.
- Macros: click on the "Macro" button and double-click on the macro you wish to add to your command line.. For example, "Name of Current Project" {$ProjectName} will be replaced with the name of your project being edited. A specific macro is used to run an option of a CustomMenu.
- Select the runtime options of the command line:
- Display the console: a console (command prompt) will be displayed.
- Leave the console opened: if a console is displayed, it will remain opened until the end of execution of the program.
- Non-locking execution: the execution of the command line will not lock the access to WINDEV, WEBDEV or WINDEV Mobile.
- Select the runtime directory of program.
- Validate
Tips - To know which project configuration is being used, simply use ProjectInfo with the piConfiguration constant.
- To activate a project configuration from the "Project explorer" pane, simply double-click on the name of the desired configuration. To open the description window of the selected configuration, select "Description" in the context menu.
- To directly open the generation directory of a configuration:
- Select "Open generation directory" in the context menu of the project configuration.
- On the "Home" tab, in the "General" group, expand
 and select "Browse generation directory". and select "Browse generation directory".
This page is also available for…
|
|
|